f. Attaching the hose. Both oxygen and acetylene hose lines are now attached
to regulator outlet nipples. The oxygen hose (green) has right-hand threads and
acetylene hose (red) has left-hand threads on their respective connecting nipples.
This prevents their being interchanged with each other. Both are clearly marked to
eliminate confusion.
g. Blowing out the hose. No dirt or grit should be allowed to remain in the
hose which could be blown into the torch where it could obstruct the flow of gases.
Therefore, before attaching the torch, each hose should be blown out after being
attached to the regulator. Keep open flame away while this operation is being
performed. The ideal way to do this would be to blow the hoses out with compressed
air before attaching the hoses to either the regulator or torch. In the absence of
a compressed air supply, the above should be followed, observing. caution to avoid
accidental ignition of the gases.
h. Attaching the torch handle. The hoses are then screwed onto the torch
handle inlet connections. Make certain they are tight. The oxygen hose is
attached to right-hand threaded nipple (often marked OX) and the acetylene hose is
attached to the left-hand threaded nipple (often marked AC).
i. Blowing out the torch handle. Turn both adjusting screws to the right
until gas flows into the hoses. Open one valve on the torch at a time, blowing out
any dirt or grit that might have accumulated in the torch handle. Close the valves
quickly to prevent further escaping of the gases.
j. Attaching the tip. Select the proper size tip for the operation to be
performed and secure it in place in the torch handle.
k. Testing for leaks. When the equipment is completely set up and the
regulator adjusting screws are set for the correct operating pressures, it must be
certain that all gas connections are "GASTIGHT". This is assured by testing each
joint with a brush and soapy water. Any escaping gas will immediately produce a
soap bubble.
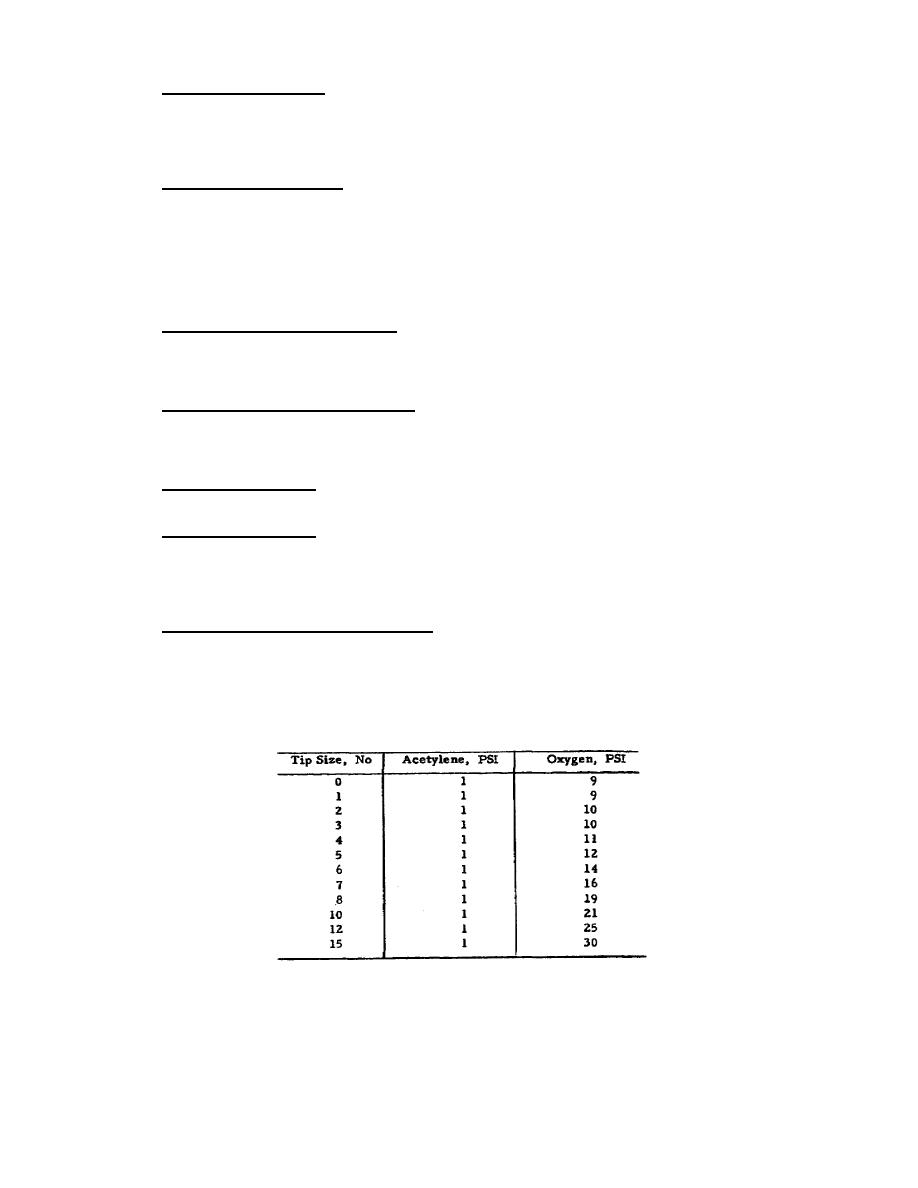
l. Adjustment of working pressure. Adjust the acetylene working pressure by
opening the acetylene needle valve in the torch and turning the regulator screw to
the right; then adjust the acetylene regulator to the required pressure for the tip
size to be used. Figures 9 and 10 provide pressure settings for a low-pressure or
injector type torch and a balanced pressure type torch. Close the needle valve.
Adjust the oxygen working pressure in the same manner.
Figure 9.
Low pressure or injector type torch.
114


 Previous Page
